1 Install on Windows
- Download the latest installer (e.g.
N1MM_Rotor_Client_v1.6.5.exe) from the Downloads page. - Run the installer. If Windows SmartScreen appears, choose More info → Run anyway (the app is not code-signed).
- The installer creates Start Menu and desktop shortcuts and installs to Program Files.
- Launch N1MM Rotor Client.
Settings are stored per user in %APPDATA%\N1MM_Rotor_Client.
2 Install on Android
- On your phone, open the Downloads page and download
the latest APK (e.g.
N1MM_Rotor_Client_v1.5.0.apk). - Open the downloaded file. Android will ask to allow installing apps from your browser — tap Settings → Allow from this source, then go back.
- Tap Install, then Open.
- Keep the phone on the same Wi-Fi network as the PC running N1MM Logger+.
The APK is unsigned by the Play Store but installs normally as a sideloaded app. It requires Android 8.0 (API 26) or newer.
3 First-time setup
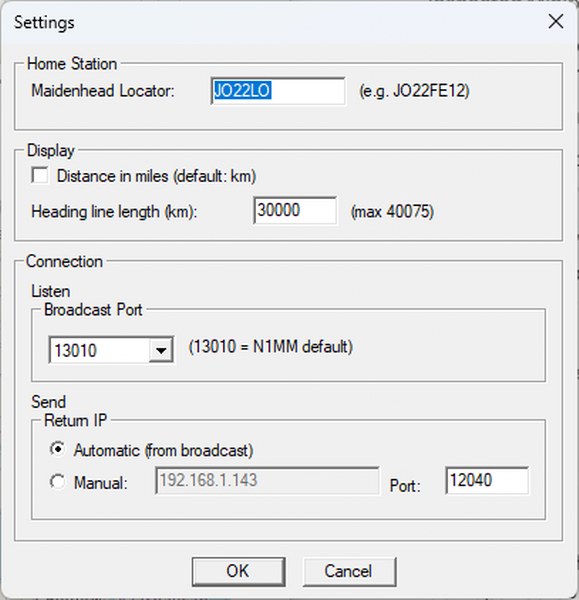
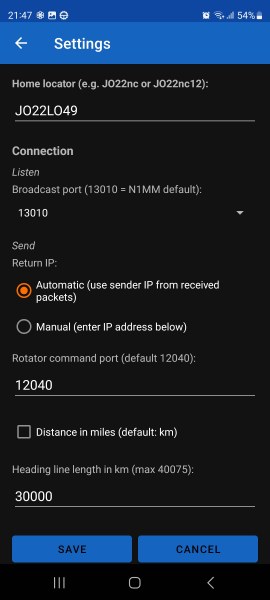
Open Settings and fill in a few fields. Both apps use the same options.
Home station
Enter your Maidenhead locator (e.g. JO22FE12). This centres
the map on your station and anchors the heading line and distance calculations.
Listen — broadcast port
Set the broadcast port N1MM Logger+ uses. 13010 is the N1MM default. The client and N1MM must agree on this port.
Send — return IP & command port
- Automatic — reply to whichever PC the broadcast came from (recommended).
- Manual — enter a fixed IP address of the N1MM machine.
The rotor command port is where azimuth commands are sent; the default
is 12040.
Display
- Distance in miles — switch bearing/distance readout from km to miles.
- Heading line length — how far the blue heading line is drawn, in km,
up to the Earth's circumference (
40075).
4 Controlling a rotor
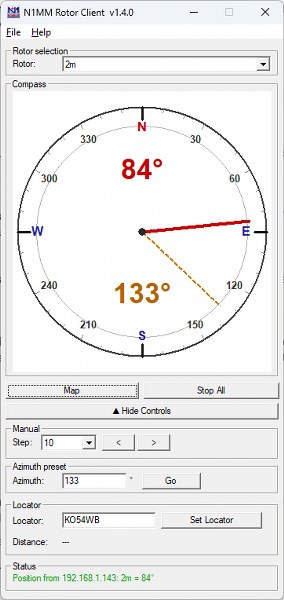
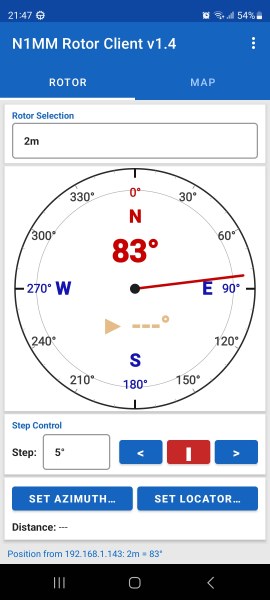
- Select a rotor from the list — it fills once N1MM's broadcasts arrive.
- Preset azimuth: type a bearing (0–360°) and press Go.
- Step: nudge the beam with < / > by the chosen step size.
- Locator: type a Maidenhead locator and press Set Locator to point at that square; bearing and distance are shown.
- Stop: Stop All halts rotation immediately.
The compass shows the current position and target as they update from N1MM's feedback.
5 The map view
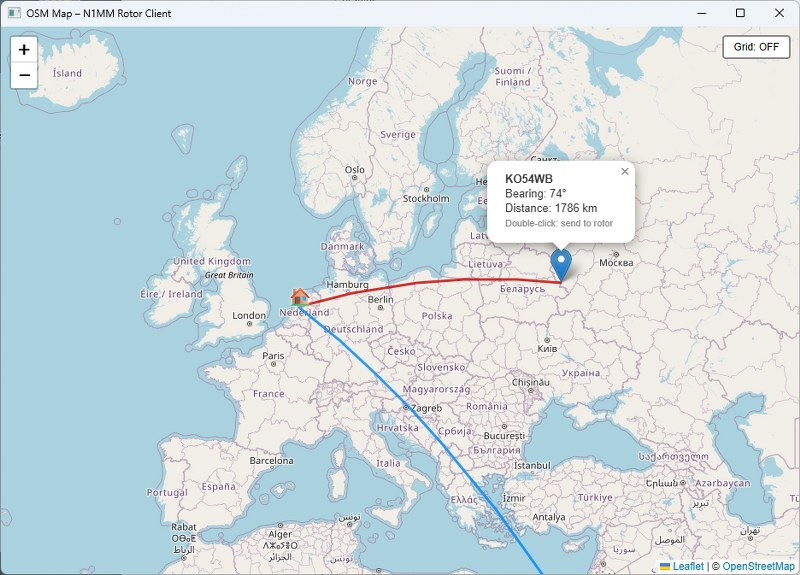
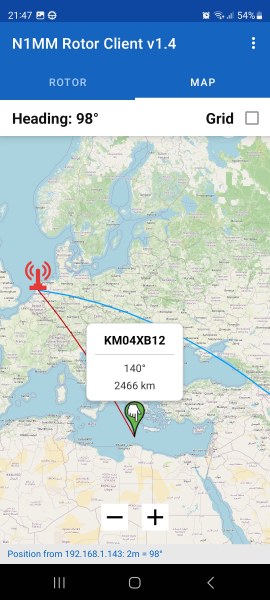
Open the map (the Map button on Windows, the Map tab on Android). It shows an OpenStreetMap with:
- 🏠 your home marker at your locator;
- a blue heading line along the current azimuth (length set in Settings);
- a red great-circle line to any destination you pick;
- an optional Maidenhead grid overlay.
Interactions
- Single click / tap — set a destination; the popup shows its locator, bearing and distance.
- Double click / tap — send that bearing to the selected rotor.
- Toggle the grid with the grid button; labels scale with the zoom level.
- Toggle the greyline — the day/night terminator with a twilight gradient, refreshed every minute. The Greyline button on Windows, the Grey checkbox on Android.
6 VOACAP propagation overlay
If your rotors are served by N1MM Rotor Server (v2.15 or newer) with its VOACAP feature enabled, the client can draw the live propagation map for the antenna's band right under the compass: your station sits at the centre, the edge of the rose is the other side of the earth, and the bright areas show where your signal is predicted to arrive.
- Enable VOACAP Propagation Overlay in Settings (both apps). Set the server's
web port if it isn't the default
80. - The overlay appears automatically for rotors that have overlay bands configured on the server.
- On a multi-band antenna, tap the band chip on the compass to cycle through the bands.
- The VOACAP chip (bottom-left on Windows) toggles the overlay on and off without opening Settings.
On Windows, Follow N1MM band (Settings) goes a step further: the client listens to N1MM Logger+'s radio broadcast and automatically selects the rotor — and the overlay band — for the band you're currently on. Enable Broadcast Data → Radio in N1MM for this.
The maps refresh every 15 minutes. Headings and compass labels get a halo so they stay readable on the coloured overlay.
7 Settings reference
| Home locator | Your Maidenhead grid, 4/6/8 characters (e.g. JO22FE12). |
|---|---|
| Broadcast port (listen) | Port N1MM broadcasts on. Default 13010. |
| Return IP | Automatic (from the broadcast) or a manual fixed IP. |
| Rotor command port | Where azimuth commands are sent. Default 12040. |
| Distance in miles | Show distance in miles instead of kilometres. |
| Heading line length | Length of the blue heading line in km, max 40075 (Earth's circumference). |
| VOACAP overlay | Draw the live propagation map under the compass (needs N1MM Rotor Server v2.15+); server web port configurable. |
| Follow N1MM band | Windows: auto-select rotor and overlay band from N1MM's radio broadcast; radio port default 12060. |
| Dark mode | Windows: View → Dark mode. Android: Settings → Dark mode. |
| View (Windows) | Normal, Compact (half-size rose), or Heading only (minimal frameless readout). |
| Check for updates | Windows: check this website for a newer installer at startup; also via Help → Check for Updates. |
8 Troubleshooting
No rotors appear
- Confirm N1MM Logger+ is broadcasting rotors and the broadcast port
matches (default
13010). - Make sure both devices are on the same network / subnet.
- On Windows, allow the app through the firewall for UDP; on Android, stay on the same Wi-Fi (not mobile data).
Commands don't reach the rotor
- Check the rotor command port (default
12040). - If using Manual return IP, verify the N1MM machine's address.
The map is blank
- The map needs an internet connection to load OpenStreetMap tiles.
- On Windows, ensure the WebView2 runtime is installed.
No VOACAP overlay on the compass
- The overlay needs N1MM Rotor Server v2.15+ with the VOACAP feature enabled — it doesn't work with rotors broadcast directly by N1MM Logger.
- Check that the rotor has overlay bands ticked in the server's rotor settings.
- Check the web port in the client's VOACAP settings (default
80) matches the server. - Right after a server (re)start the maps can take a minute to compute — the overlay appears automatically once they're ready.